Volume 8
Chapter 56
320 - Battling GIT to the Death - 2014-12-03
This isn't even funny anymore. I must find a way to use GIT and GITHub better.
This section will detail how to:
- Setup a GITHub account
- Create a repository on GITHub
- Clone it back down to your desktop
You could have started with a repo on you desk top and then pushed it back up to GITHub but this is the simplest set of steps.
Creating a GITHub Account
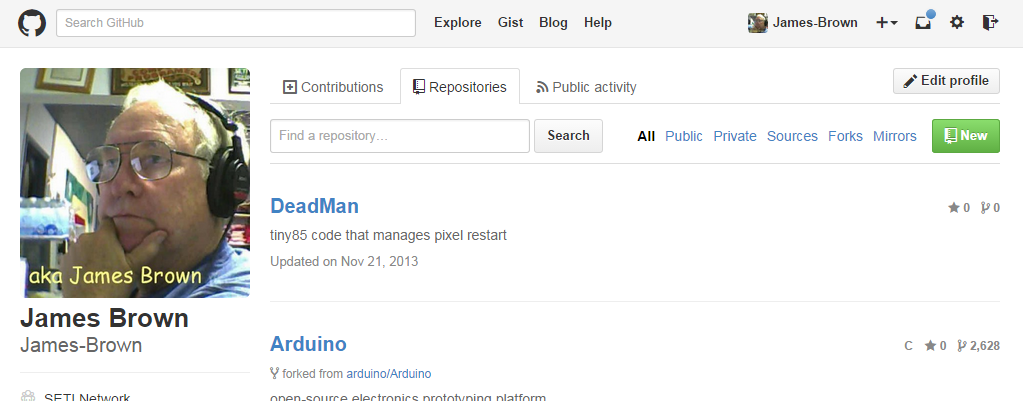
Google GITHub and create your account. Its free. Make *sure* to remember the username and password you choose.
Log in and click on your user name (top right). This is what my account looks like:
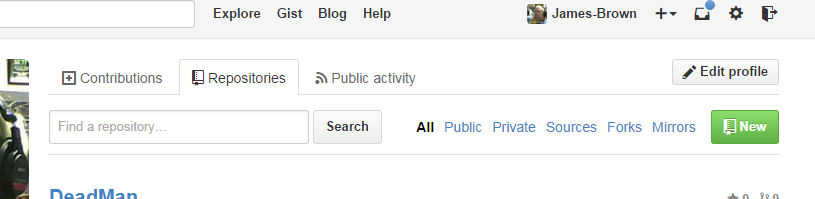
Make sure to select the Repositories tab and then hit 'New'
- Enter the name of the new repo as "datasciencecoursera" to match the name needed for the course.
- Enter some sort of Description. Make sure 'Public' is set and that the 'Initialize with a README' is checked.
- Hit the 'Create repository' button.
That is all there is to it on the remote end.
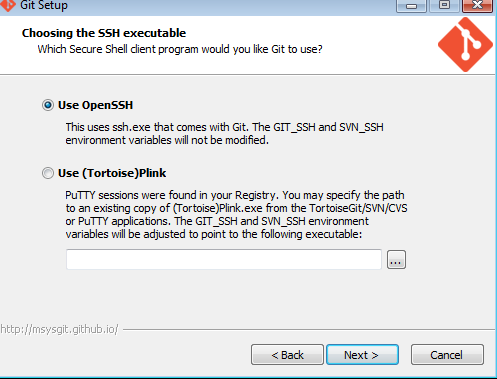
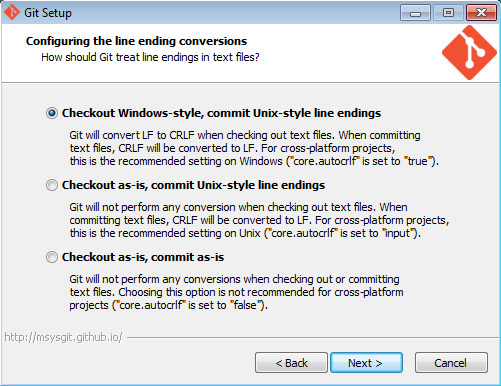
GIT for Windows
This builds your GIT client on your home machine.
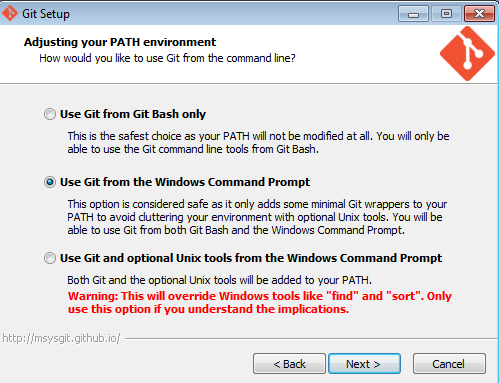
Download Git for Windows http://git-scm.com/download/win
Install it:
Pay close attention to the selections I have made. They might not be the best but they do work for me.
Cloning your first Repo
I found the on-line book 'git book' to be good at getting started. I also suggest you finish this step-by-step first before you dive into the book. It is well written but will drag you off into places of darkness. Do this stuff first and then go back to the book.
Using Windows Explorer ![]() navigate to the root of your C: drive. Right click on it and Add a new folder "datasciencecoursera" at that point.
navigate to the root of your C: drive. Right click on it and Add a new folder "datasciencecoursera" at that point.
Select the new folder and right click on it. Select 'Git Bash Here'. This opens a DOS window with Bash running in that directory
Set the default editor to be used on the system with the command:
$ git config --global core.editor notepadSimplest is Notepad. Like this:
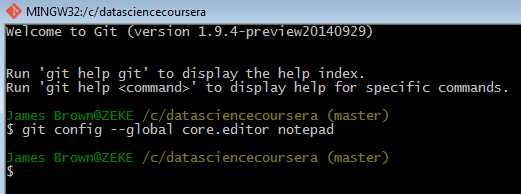
If you fail to set up a simple editor Git will make your life unbearable until you do...
Cloning
Clone your remote repo with:
Of course you will have to enter your name not mine "James-Brown". You then wind up with:
Notice that the datasciencecoursera folders are duplicated. I don't know how to do it any other way.
Create a Test.txt file with Notepad and save it in your repo (the bottom datasciencecoursera) on your local machine.
Add the Test.txt file to the repo with the following:
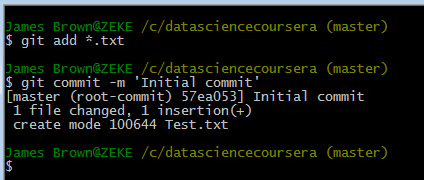
These two commands (git add *.txt and git commit -m) make the addition of the all files *.txt and commit them (just one) to the repository. It will be tracked from now on.
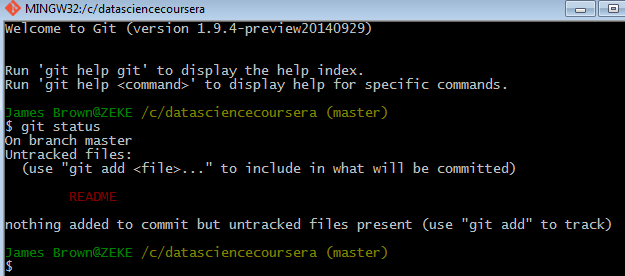
Check Status
Results of the 'git status' command should look like this:

Add a second file to the repo directory. Something like a README created with Notepad again. You have to create the file and then remove the .txt extension from it. Not as easy as it sounds because Windows insists on having extensions on all files but Git and Linux does not (sigh). The run the status again:
This shows an untracked file in the directory run:
$ git add README
to add that new file and then once more run the status
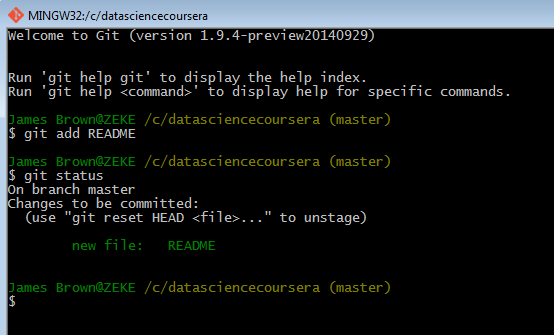 The README is not tracked and staged to be committed.
Committing Changes
do a commit
This will start your default editor where you can enter the text you would like:
Pushing to GITHub repo.
Do the push like this:
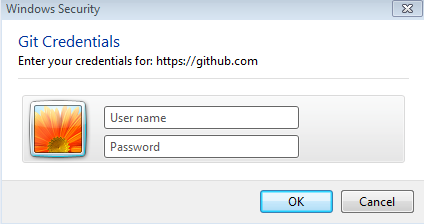
You will also get a dialog box for your user name and password:
(Please note: I don't always get this dialog but the information can be entered on the DOS prompt.
Another thing: When your entering your password you see no echo characters. Poor implementation but that's how it is)
You should get a response "Everything up-to-date" on you Bash window or no response at all. Anything but an error is acceptable.
If you made it through to this point without a lot of hassle go back and read the 'GIT Book'. It will make more sense now.
319 - Database Errors - 2014-11-27
I have a working database system but it has a fatal flaw. Errors creep in and are difficult to detect.
The database is suppose to work like this:
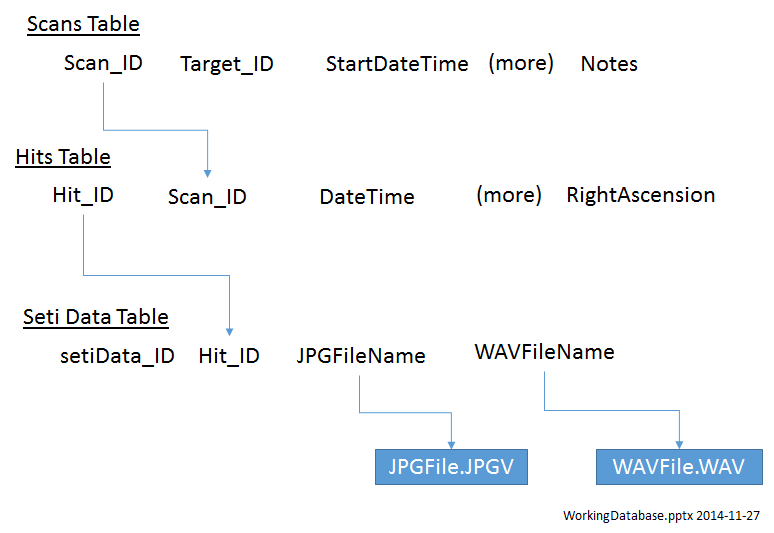
With this structure I can move from a Hit down to the data collected on that hit or back to the Scan in operation when the Hit was detected. Thats fine but sometimes during the collection of Seti Data I will have a hardware failure and have to delete the entry. The leaves me with a forward pointer in the Hits Table but no corresponding entry in the Seti Data Table. The same sort of thing happens between the Scans Table and the Hits Table for the same reason.
This is a SQL snipped that will identify when a scan.Scan_ID does not show up in a hit.Scan_ID entry. Then I can go back and delete the Scans Table entry.
| SELECT scans.Scan_ID FROM scans left JOIN hits on scans.Scan_ID = hits.Scan_ID WHERE hits.Scan_ID IS null |
The same structure can be used between the Hits table and the Seti Data table. I need the following detectors:
- ScanNoHit - Many scans will result in no hits. Normal operation
- HitNoScan - Each Hit table entry must have a corresponding Scan table entry. Error possible
- HitNoSetiData - Each Hit table entry must create at least on SetiData table entry. Error possible.
- SetiDataNoHit - Each SetiData must come from a Hit table entry. Error possible
- SetiDataNoWAV - Each SetiData must create one WAV file. Error possible
- SetiDataNoJPG - Each SetiData must create one JPG file
- WAVFileNoSeitData - Each WAV file must have a corresponding SetiData table entry
- JPGFileNoSetiData - Each JPG file must have a corresponding SetiData table entry.
318 - Ubuntu and GNR Radio - 2014-11-04
I have had a string of failures - I need a win. I feel like the SD Chargers - on a roll for while but then the wheels came off. So now I am looking for another approach to the HackRF radio project.
Looking over the various ReadMe files on Great Scott Gadgets (the home of the HackRF) I decided to try starting a Linux system and working with the Hack in its native environment. The trouble is that Linux is a complete unknown to me.
Watching the first video produced by Michael Mossmann I found that he recommended using the Linux distro Pentoo. I found the ISO copy of that easily enough on the web and downloaded. I used ImgBurn to make a DVD with nothing but that ISO image on it. I installed it on a 300 Meg hard drive I happened to have lying around and started it up.
Right away my lack of knowledge with Linux got in the way. The installer was asking me do perform operations that had not the slightest idea how to do. I did get Pentoo running but could go no further.
I decided that I need to install a distro that was intended for 'boys and girls' that might be one that even I could manage. I went for Ubuntu. I downloaded the ISO version of Ubuntu 14.04.1, burned it to another DVD and installed it on Sagan (my SETI machine) 'side by side' with the Windows 7. This went well and produced a dual boot hard drive that would run either Win7 or Ubuntu easily and cleanly.
I played with the installation for a while to become more familiar with Linux operation in general and Ubuntu in specific. I like the Ubuntu layout because it has echo's of Windows in it. So far so good.
I then I went back to Great Scott and found links to installing GNU Radio under Ubuntu that were described as 'easy'. That should have been my first clue. They didn't work either.
Then I found my way to mossmann/hackrf on GitHub with these simple instructions:
This actually works sudo add-apt-repository ppa:gqrx/releases sudo apt-get update sudo apt-get upgrade sudo apt-get install gqrx gnuradio gr-osmosdr hackrf For other options see: http://www.pg540.org/wiki/index.php/HackRF If you run into installing troubles (for example a 'Held packages' type message), possibly because of existing packages previously installed, do a sudo apt-get dist-upgrade
|
I cut'n pasted each of these into the command line Terminal and each one worked. At last a working Linux and GNU Radio installed and running.
I spent an hour or so watching Lesson 1 - "Welcome" from Great Scott Gadgets and finally had my first GNU Radio running on HackRF One.
At last a win...
317 - Unwinding HackRF Tools - 2014-10-25
The developer of HackRF has provided a GIT repository for his open source code. In that repository he has also proved a set of low level tools that can be used to control the HackRF from the command line. My short term goal is to be able to re-compile one of the tools (hackrf_info) so that I can understand its operation.
When I have hackrf_info in hand I can construct the equivalent tool in Delphi and use that as a model for the development of a SETI Receiver using the HackRF One.
The developer has courageously included a Readme that shows how to compile the tools under Windows using cygwin or mingw. These are Windows tools chains that will create compatible object code from Linux source. Just what I want to do.
This is the step by step I am attempting:
Install cmake with these options:
- I used Windows (Win32 Installer) - About 10 Meg.
- "Add CMake to the system PATH for current user" and Create CMake Desktop Icon
- I installed in the default C:\Program Files\CMake
I picked up libusbx-1.0.18 from sourceforge (libusbx-1.0.18.tar.bz2). I extracted it and moved it to my C: drive root (C:\libusbx-1.0.18)
I have hackRF running under SDRSharp and I *think* I used Zadig to get it going but I am not sure so I will re-install using Zadig from the web site (Zadig for Windows Vista or later). This is version 2.1.0.
I downloaded and executed it. Under Options I selected "List all devices". Then in the combo box drop down I could see HackRF One. I selected that. I got back USB ID 1D50 and 6089. I hit "Reinstall Driver" and got back a success message.
Then the README file says "Build libhackrf before to build this library, see host/libhackrf/Readme.md." So I go back to that README. This is what I find.
For Cygwin:
- cd host
- mkdir build
- cd build
- cmake ../ -G "Unix Makefiles" -DCMAKE_LEGACY_CYGWIN_WIN32=1 -DLIBUSB_INCLUDE_DIR=/usr/local/include/libusb-1.0/
Since to this point I have not downloaded the source from GIT I do that now with the GIT provided Zip. It installs into C:\hackrf\hackrf-master\host.
I switch to a DOS prompt at this directory (host) and do:
- mkdir build
- cd build
That seems to work. Then:
cmake ../ -G "Unix Makefiles" -DCMAKE_LEGACY_CYGWIN_WIN32=1 -DLIBUSB_INCLUDE_DIR=/usr/local/include/libusb-1.0/
I get back "CMake Error: Could not create named generator UNIX Makefiles"
It seems obvious that the include directory path is wrong but what should it be? I don't have a libusb-1.0 subdirectory in my C:/libusbx-1.0.18 directory
<stuck at this point>
This is simply not working and because I work alone I have nowhere to turn for answers. I have learned a lot but have not succeeded in my project so I have to find a new approach.