V5 Chapter 41
Details
229 MySQL Default Tabel type 2011-05-14
I am using one of my old favorites XML Spy to design the database.I'm changing the original SML to accommodate the new database engine MySQL.One of the early problems was the my ISP only supports MyISAM table types in its MySQL server and XML Spy was outputting INNODB type tables.A quick question on the MySQL forums yielded this answer:
| It is not a session variable, so you cannot change it "on the fly"
You first should locate the MySQL config file named my.cnf (or my.ini).
Then in that file find the [mysqld] and add the following line below it
as shown below. [mysqld] default-storage-engine = myisam |
Now I can futz around with the table structure to my hearts content without worrying about adjusting the table types every time.
228. Working with FrontPage 2011-05-03
I have been working with MS FrontPage as my web site authoring tool for many years and I have become accustom to its quirks and foibles. I finally know where 80% of the functions that I need can be found and how to navigate in the web site.I even like it.It was knowledge hard won and I am loath to change to one of the newer authoring tools just to keep up with the times.
To make FrontPage and php compatible you must do the following:
Change settings in FrontPage 2003 |
| Before you can use PHP with
FrontPage 2003, you must make the
following changes to settings in
FrontPage:
Disable features that require the FrontPage Server Extensions If the Web server that runs your
PHP pages has the FrontPage
Server Extensions from Microsoft
installed, do the following:
Disable features that create ASP or ASP.NET code. If the Web server that runs your PHP pages can also run ASP, do the following:
Enable and use ASP-style <% %> code delimiters Do the following:
Note As an alternative, you can use <script language="php"> and </script> tags instead of <? php?> tags. Configure PHP file extensions to open in Design view
If the extension that you want does not appear, you must add it. How?
|
That seems to work fine.Now I can develop the php code I need using phpDesigner 7 and then embed it into my web site and build the visuals using FrontPage.
227. Chuck MySQL Workbench and start over
After struggling with MySQL Workbench for *way* to long I finally realized that my difficulties were not all >my fault.The steps necessary to build a new ERR diagram and export it to the database server (steps 225) are simply not intuitive.
So I did a survey of the other tools available and selected a new tool set to work with.I need tools that work with Delphi and have direct access to MySQL databases.Here are the candidates:
| TMySQL | Not well maintained |
| Direct SQL | Source Forge |
| SciBit | Nice tool set |
| Zeos | Installed this and tried it |
| DevArt | Best of the bunch and not too expensive |
| Via Verio | No information |
| MySQL DAC | Good tools but a bit hard for me to us |
It took most of the day but I finally settled on DevArt system.Its installed and the tool set is very intuitive.It has a small cost to it but right now I'm working with the evaluation set..
2011-04-24 Work in
progress.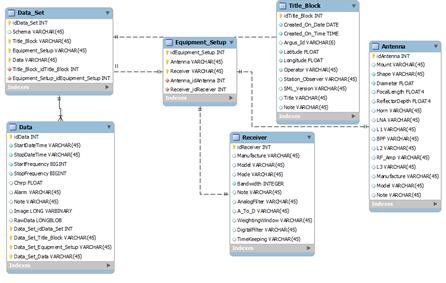
225. MySQL Workbench2011-04-19
Step by step using this tool:I have written this as a way to keep track of the setup necessary for the MySQL Workbench tool that I'm using.It is adapted from the MySQL Workbench Documentation section 4.0 but changed to fit the release (5.2.33b GA- 2011-03-21) that I have installed.Workbench is one of those deceivingly simple looking tools that should be usable without documentation at all, the mark of well designed software in my not so humble opinion, but it is not.So you may follow these instructions if you wish and good luck.
4.1 Administering a MySQL Server
4.1.1 Launch MySQL Workbench -You will be presented with the Home screen.
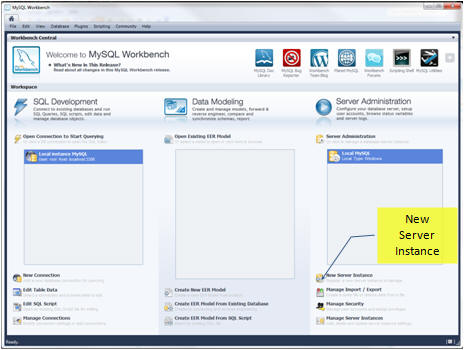 |
Create a Server Instance |
4.1.2 New Server Instance - To administer your MySQL Server, you must first create a Server Instance. The instance contains information about the target server, including how to connect to it. From the Home screen of MySQL Workbench, click New Server Instance. The Create New Server Instance Profile wizard will be displayed.
 |
New Server Instance Profile Wizard |
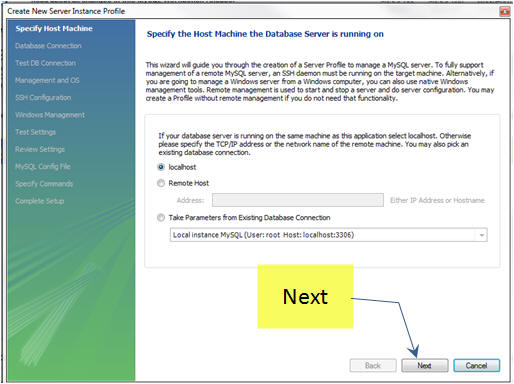
4.1.3.LocalHost - In this tutorial, you will connect to a locally installed server, so make sure that is selected and click Next
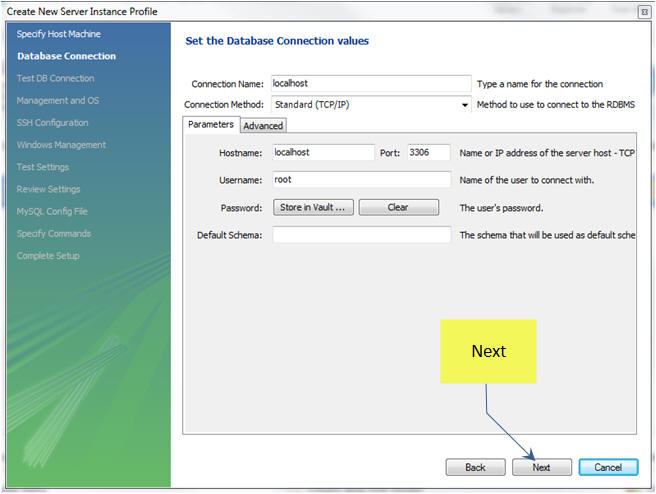
4.1.4.Setup Connection -Next you will set up a connection, or select an existing connection to use to connect to the server. Assuming that you have not already created a connection, you can use the default values here, although if your MySQL Server has a password set for the root account, you can enter it here by clicking on Store in Vault. This enables you to connect to the server without needing to enter a password each time. It is also possible to use a different account to connect to the server by setting the user name and password here, if required.
Press Next.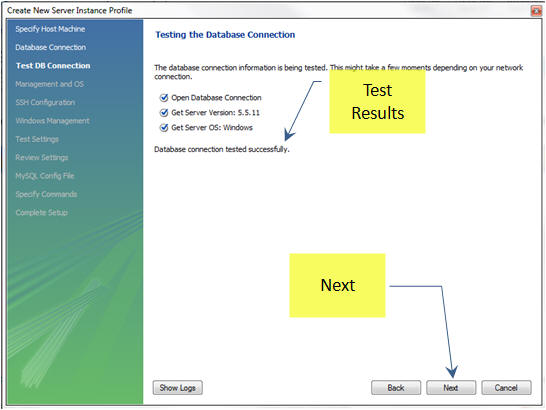
4.1.5 Test Results - The connection will
now be tested. You should see that the connection was successful. If not click Back and check that you have entered the
information requiredClick Next.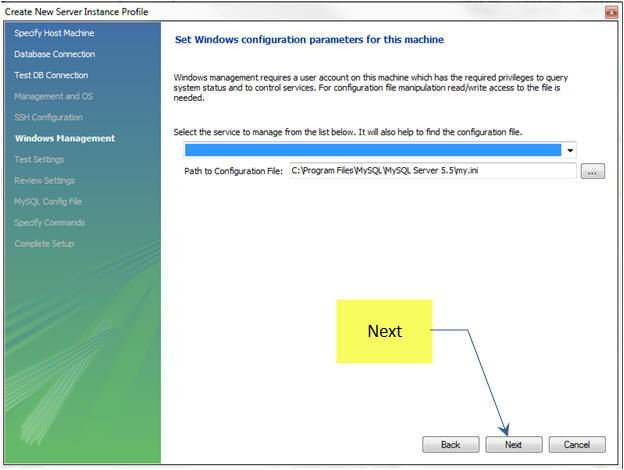
4.1.6 Windows Parameters - On this screen, you will set the operating system and installation type. In this case, the operating system is Microsoft Windows, and the installation type is MySQL 5.1 x86 Installer Package. Setting these options enables MySQL Workbench to determine the location of configuration files, and the correct start and stop commands to use for the server. Press Next.
 |
 |
| Continue Screen | Instance Profile |
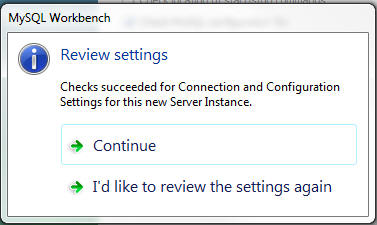
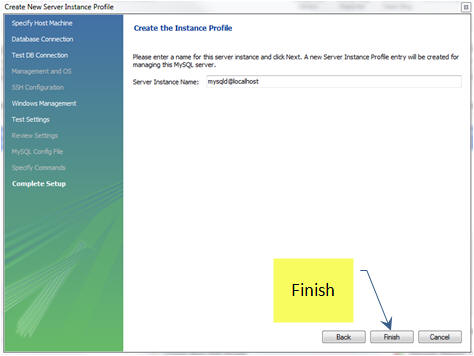
4.1.7 Name the Instance - After accepting the review you finally you can give the server instance a suitable name. This will be used to select this particular instance from a list of available instances.Press Finish.
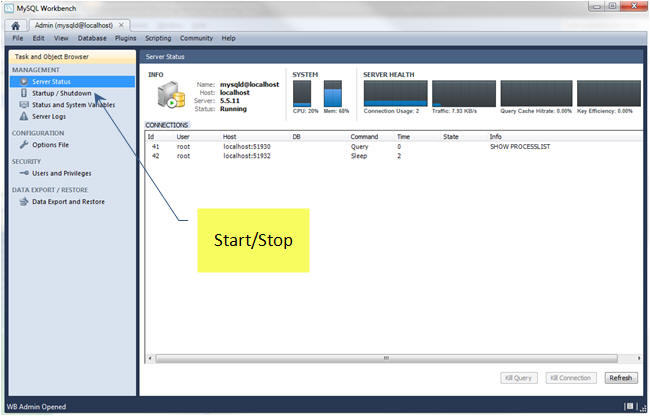
4.1.8 Start/Stop - You can and stop this instance of the server you have just created here.Now press the 'house' (top left) to return to the home screen.
4.2 Creating a Model
In this section, you will learn how to create a new database model, create a table, create an EER Diagram of your model, and then forward engineer your model to the live database server.
4.2.1 - Create EER Model - From the home screen select Create new EER Model. A model can contain multiple schema. Note that when you create a new model, it contains the mydb schema by default. You can change its name to serve your own purposes, or delete it.
4.2.2 Add New Schema - On the Physical Schemata
toolbar, click the button + to add a new schema.
This will create a new schema and display a tabsheet for the schema. In the
tabsheet, change the name of the schema to “SETI_data”,
by typing into the field called Name. Ensure that
this change is reflected on the Physical Schemata tab. Now you are ready to add
a table to your schema. If at this stage you receive a message dialog asking to
rename all schema occurrences, you can click Yes to apply your name change. 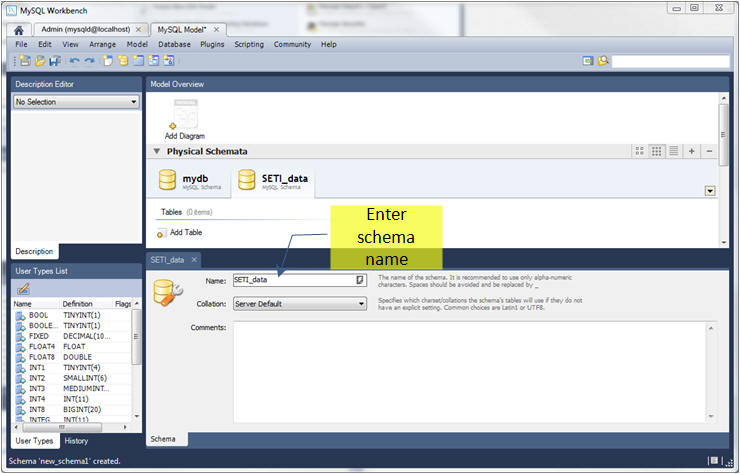
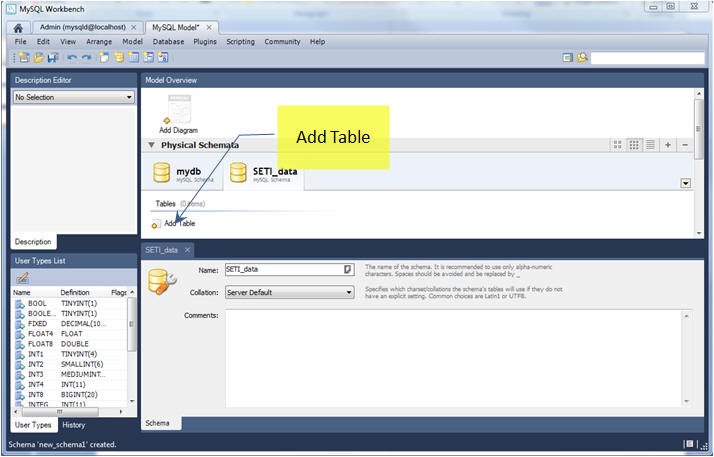
4.2.3 Add Table - In the Physical Schemata section, double-click Add Table.
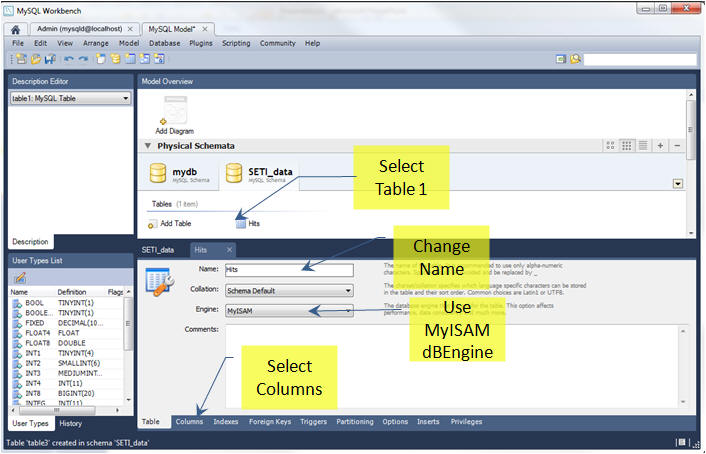
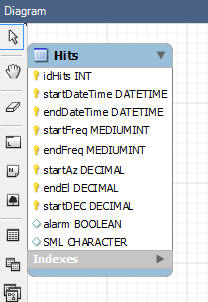
4.2.4 Change Table Name and engine- Select 'Table 1' and change its name.Select the database engine.My remote server uses the MyISAM engine so this is selected.Then Select the Columns tab to start the definition of the columns in the table.

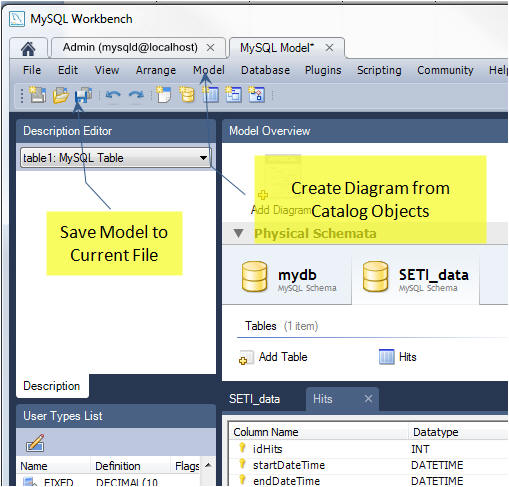
4.2.5 Save Model / Create Diagram - At this point, you can save your model. At the top of the screen press the Save Model to Current File icon. Since this is the first time to save the model you will be prompted to enter a model file name. I used “ SETI Data Schema”. Click Save to save the model.Next press the 'Model | Create Diagram from Catalog Objects' menu item and you will be presented with an image of the table so far.
4.2.6 Synch with Server - You can synchronize your model with the live database server. First, you must tell MySQL Workbench how to connect to the live server. From the main menu, select 'Database | Manage Connections'.You are presented with the Manage DB Connections dialog. ....
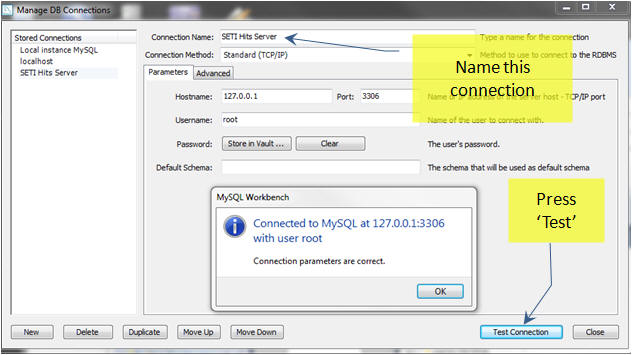
4.2.7 Manage DB Connections -
4.2.8 Forward engineer - You are now ready to forward engineer your model to the live server. From the main menu, select 'Database | Forward engineer'. The Forward engineer to Database wizard will be displayed.Simply press Next.
 |
Forward engineer Options |
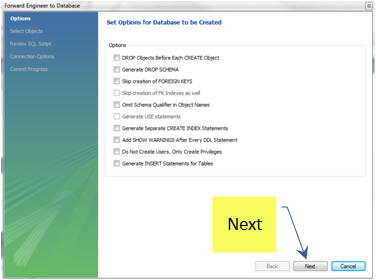
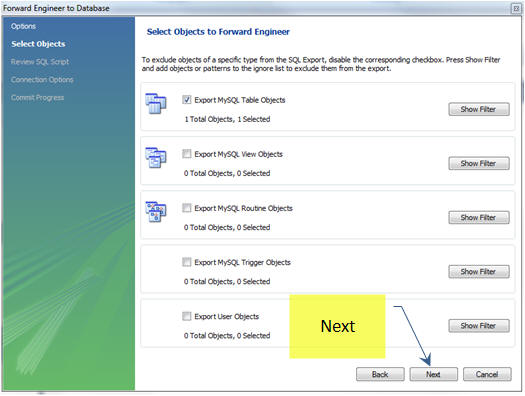
4.2.9. Options -The Options page of the wizard shows various advanced options. You can ignore these and simply click Next.

Hit Next on Review as well.
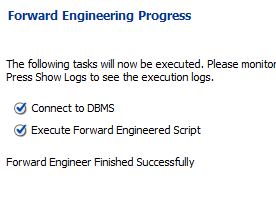
4.2.10 Do It - Make sure you have the Stored Connection set, check the I.P. address then Execute.You will see a progress dialog and some test results..
 |
|
|
| Progress Dialog | Test Results |
2011-04-10
SETI Net uses a database to track the hits as they come in. Each hit is Date/Time stamped along with all the information that appears in the status screen.This allows the hits that have been falsified to be ignored the next time they appear in the system.After all its enough to go through the ET Alert drill once not over and over.Since most (almost all) alerts are falsified by moving the antenna the frequency of the alert is the only decimator.Therefore the alert frequency is used to skip not the pointing angles of the antenna.
The data base in use is a simple CVS system, a comma delimited line by line listing of alerts and this seems to work alright but I always wanted to update it to a system that would allow live data be be presented on the web site.To do this I have to move to a modern data base system.I have added:
-
MySQL to the web site server ( www.SETI.Net ) I will have to write server side script to present the data
-
PHP to the web site.The server side script will be written in this language
-
MySQL to my development machine.This is the community version and is free.
-
MySQL Workbench to my development machine.This is the tool I will use to maintain both the web server and my local machine database
-
ZeosDBO components to my Delphi 7 installation.These components will allow me access the database directly from my running code.
This the plan so far.Right now I am going though a tutorial on the workings of MySQL Workbench.
225. SearchingL4/L52011-04-08
The description of the L4/L5 search is available (TBD) am not very proud of this write up and will be working on it from time to time.