Volume 8
Chapter 58
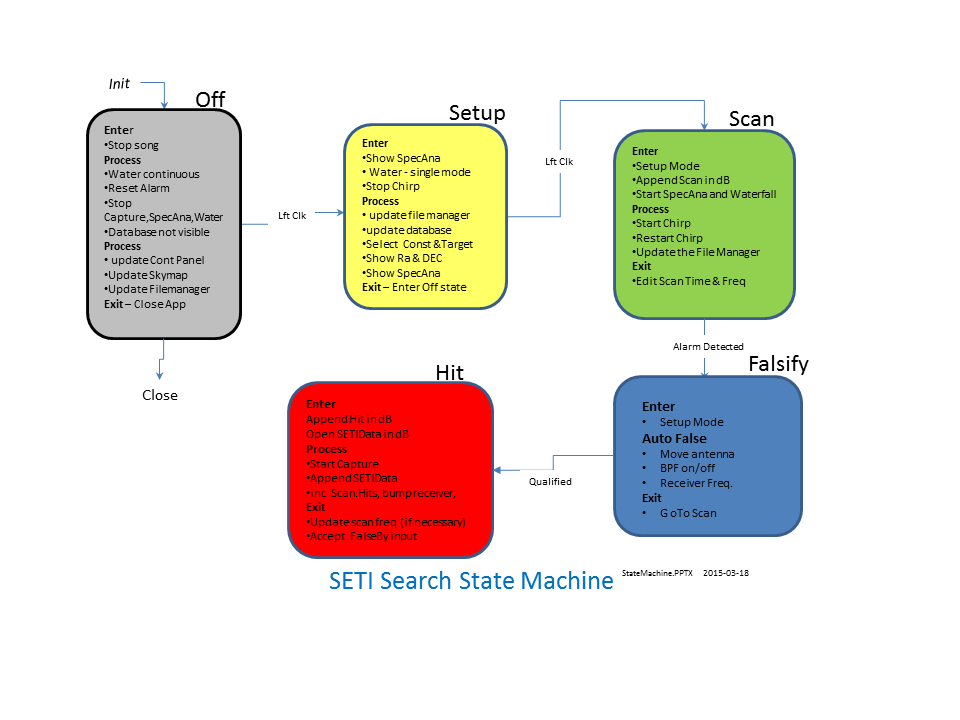
332 - Auto Falsification State 2015-03-18
For a very long time now the only way to falsify a hit was to manually stop the search operation and then perform one or more of the following operations.
- Move the antenna off axis and note that the signal amplitude did not go down - This is a local signal not coming through the dish horn
- Turn off the Band Pass Filter and note that the signal increased in amplitude - This is an out of band image
- Move the receiver frequency up (or down) and note that the signal did not move in reverse of that - This is an image
This operation required a lot of work on my part and could be done by the system itself. These operations will be included in a new state Falsify.
This is simply to confusing. If I can't follow my own damn code then its time for a rewrite. I am going to look at a completely different architecture stating with Remote Procedure Calls. I have used RPC years ago and it did work. Lets see what is new in the world.
331 - Mapping Network Drive Fails 2015-03-17
My new Network Attached Storage (NAS) drive from Western Digital does not automatically connect when Windows 7 is restarted. This causes problems on power down recovery and just annoying as hell. It's a known problem and has been blogged about for years but Microsoft never came up with a fix. This works.
First - Setup the map:
With Windows Explorer right click on the computer (Zeke or SAGAN in my case). Select 'Map to network drive'
Choose Z as the drive and navigate to the folder
Second - Make a simple batch file. Mine is called WakeZ.bat. It contains this simple mapping command:
***** CASE SENSITIVE *************
net USE Z: \\WDMYCLOUD\Public
***** CASE SENSITIVE *************
Then you can put the batch file in your startup commands like this (Windows 7):
- Start
- All Programs
- Rt Click on Startup
- Open
- Drag and drop your batch file into the directory
Or this for Windows 10. Drag and drop the batch file to:
C:\Users\JamesBrown\AppData\Roaming\Microsoft\Windows\Start Menu\Programs\Startup
On restart the NAS still shows up as not connected in the application tray but it is ready. The not connected symbol will quickly go away.
330 - Make Notepad ++ your default 2015-03-15
I hate Notepad. It sucks. A much better tool is Notepad ++ which is free and formates the output to a readable form (unlike he twenty year old Notepad from Microsoft). The problem how to replace Notepad with Notepad++. Try this. It seems to work.
329 - Daylight Savings ToDo List 2015-03-09
The following projects are being worked
- Database Integrity - The tables in the SETI database are checked using Tools but there is something massively wrong with the logic
- ZoomFFT - I have the source for this SDRSharp plug in and need to integrate it into the development source. This is from SDRdev source
- HackRF - I would like to use this code from SETI net somehow
- AutoFalse - Its important that I modify the search logic to automatically falsify hits in real time. Its not acceptable that they have to be manually falsified later.
328 - NAS and Symbolic Links 2015-03-09
Mapping Network Attached Storage(NAS)
I need a way to consolidate the collection point for the raw SETI data by station generates. I needed a NAS.
I started out with a Netgear RN 102. I put one of my 1 TB hard drives in it, installed it and it quickly came on line - exactly what I wanted at a bit less then $200.
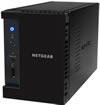
Netgear RN 102
Later on that day I had a simple question about the operation of the device so I logged onto the Netgear chat line. The "service tech" told me that because the device had been built more than a year ago Netgear protocol required that I prove to them that I had just bought it. I explained that although it was Netgear's protocol to prove such a thing it was not mine. I had purchased the box along with a promise of support but they would not honor there part of the agreement.
Forty five minutes later and several exchanges, each one nastier than the last, along with three on-line techs and there supervisors I told them that they could take there 'protocol' and shove it up there collective ass.
So I went back to Fry's to return a perfectly good NAS drive that I was happy with. I then bought a Western Digital My Cloud drive (with a 2 TByte hard drive in it already) for less money to boot.

Western Digital MyCloud
Netgear has permanently lost a good customer and Western Digital gained one all because no one at Netgear could take the initiative and answer a simple question without following there 'protocol'.
Fuck Em.
Now that I have that off my chest. I set up a share on the MyCloud drive called 'seti_data' to hold all the WAVs and JPGs that the station generates. These are then moved to the remote Apache web server for on line access by users of www.SETI.Net.
I then went to Start>rt click on the computer name (Zeke in my case) and selected 'Map Network Drive'. I set up drive Z on Zeke so that it maps directly to the share on the NAS named seti_data.
I repeated the process for my other machine, SAGAN, so that now both machines have Z drives that point to the same location on the NAS. Either machine can update the SETI data and either machine can be used to update the seti_data directory in the remote server.
Then to make the differences in directories on my two machines and my remote server come out right I used used symbolic links. This is how:
- Install Link Shell Extension This allows directories to be setup on one drive that can be referred to as local on a different drive.
- Start Windows Explorer and browse to the the directory you want to set up the link from. In my case it is seti_data(\\WDMYCLOUD)(Z:). Right click and select Pick Link Source. This option was installed by Link Shell Extension.
- Navigate to the public_html directory that holds the SETI Net web site and select 'Drop As Symbolic link".
Its now all tied together. Any machine, Zeke, SAGAN and the web server, can refer to the seti_data as if it were on a local directory without creating special software for any of them.
Sweet.
327 - Mix Master 2015-03-02
Obfuscation - The SDRSharp source, that I am attempting to use, obfuscates the RTL SDR code by commenting it out in the file SDRSharp.exe.Config.
I have found that the file SDRSharp/app.config is the source for the overwrite and can be edited directly to include RTL SDR and the other plug-ins being worked on.
Unsafe - The lowest levels of SDRSharp require that they be flagged unsafe. This allows the compiler to deal with them. To set unsafe do this: RtClick on Project (SDRSharp.ZoomFFT), Select Build tab, check 'Allow unsafe Code', SaveAll.
326 - ZoomFFT 2015-03-01
I have been trying to figure out how to use HackRF on as a primary receiver in SETI Net for a while now and am not getting much closer. What I would really like is a way to use the SDRSharp GUI for the receiver but route the ZoomFFT output to a Delphi module for processing. That would allow me to gain the sweet user interface of SDRSharp, the wide bandwidth available with the ZoomFFT plug-in and the detection logic I use for SETI Net.
This is my latest fumble at this project.
I plucked this off of Rededit and will use it as a start on my own ZoomFFT plug-in.
steps to getting your plug-in development to work in SharpDevelop.
- get sdrdev from sdr# plugin page - This went easy. Directory is: B:\SETINet\Receiver\SDRdev\SDRDEV\RTLSDR. Also has late source for the RTLSDR which is nice
- go to GITHUB and get SDRSHARP Common trunk - This can't be done since the source developer has reverted to non-open source. Luckly I have a version of the source that does compile.
- copy SDRSHARP Common trunk into <your development root>/sdrdev/SDRDEV/ - Done.
- copy ZoomFFT into a new folder and rename to your plugin - its B:\SETINet\Receiver\SDRdev\SDRDEV\ZoomFFTSETI
- rename all ZoomFFT's to your plugin name - Started Visual Studio 2013 and used its refactoring services to rename the new plug in to ZoomFFTPluginSETI.
- go through *.cs and rename the namespace to your plugin name - Done in above
- open SDRSharp.ZoomFFT.csproj and replace all occurrences of ZoomFFT with your plugin name - Done above
- open SDRSharp.ZoomFFT and replace all occurrences of ZoomFFT with your plugin name - Done above
- open SDRSharp.yourPlugin.csproj and copy the following 4 XML propertygroups:
- <PropertyGroup Condition=" '$(Configuration)|$(Platform)' == 'Debug|AnyCPU' ">
- <PropertyGroup Condition=" '$(Configuration)|$(Platform)' == 'Release|AnyCPU' ">
- <PropertyGroup Condition="'$(Configuration)|$(Platform)' == 'Debug|x64'">
- <PropertyGroup Condition="'$(Configuration)|$(Platform)' == 'Release|x64'">
- Open the new plugin project.
- Right-click and select Unload
- Right -click the project again and select Edit
- This puts the project file in an XML editor
- copy the block of propertygroups into SDRSharp.Common.csproj
copy the block of propertygroups into SDRSharp.Radio.csproj - copy the block of propertygroups into SDRSharp.Panview.csproj
- go to the properties directory inside your project and open AssemblyInfo.cs. Edit to reflect new project name.
- set compiling option to "allow unsafe code" - Open project Properties page, click build property page, Select Allow Unsafe Code
now build the project - go to /bin/debug/ and copy the DLL into your sdr# folder where the other DLLs reside. Edit "plugins" XML file and add your plugin.
- start SDR# and the pluging should appear. If you've made a mistake in assembling the DLL, you will get an error. however, the error will be fairly easy to track to the problem. took me about 2 hours to get it right.
- To do this in VS 2013 you must:
